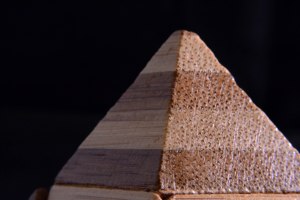
For this assignment I am required to produce a series of images of a subject using either natural light or lighting from a studio type setting. The objective was to demonstrate Form, Texture, Shape and Colour.
Form – How 3 dimensional an object is.
Texture – The surface detail of an object.
Shape – The outline/edges of an object.
Colour – Self explanatory.
I decided on using studio lighting and a photographic cube. The handbook requires that we take 8 images, 2 for each category. I decided to shoot 1 of each on a black backdrop, and one of each on white.
Colour:
F.22, 10/80 sec, ISO 2200.
For this image I used 2 photographic lights – one positioned at the top left of the subject, and a diffused light overhead. I also used the flash on my camera lighting up the subject from the front. The camera flash was also diffused as to not create a strong harsh light – as this would make it difficult to observe the different shades of wood. I felt that in order to demonstrate colour against a white backdrop I required several lights to bring out the multiple colours of wood.
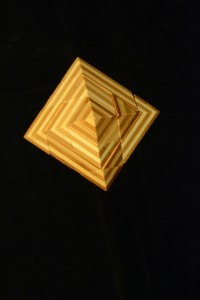
F.36 10/16 sec ISO 2000
Using a black backdrop instantly enabled me to demonstrate colour far easier than with the white backdrop as the subjects colour stands out more. For this shot I used an overhead diffused light, and a diffused flashgun positioned to the left of the subject. (The flashgun was approx 3 feet from subject.) The angle of the camera removes any kind of form, and makes the stripes of colour one of the most obvious factors. By using a secondary light source from the left it renders the right side of the subject in a slight shadow – enhancing the darker parts of wood.
Form:
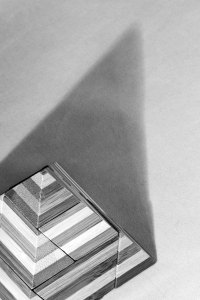
F.22, 25/10 sec, ISO 100
To demonstrate form I had already decided that I did not want to include the whole object, but rather show form using a section of object and its shadow. The lighting here was fairly straightforward – I used 2 strong photographic lights, positioned at the bottom left of the object. The whole object is not visible, yet you can identify its form from the shadow.
F.36, 30/10 sec, ISO 220
One of the strongest ways to demonstrate form in photography is to include shadows. For this image I used a strong light, positioned very low to the floor and positioned at the top left. The camera is positioned overhead using a tripod.
Shape:
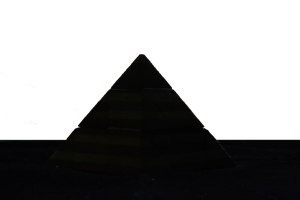
F.36, 10/16 sec, ISO 3200
Fortunately the object I have chosen to use has an extremely distinguishable shape. Demonstrating shape through using its silhouette is extremely striking. To get a vast amount of strong intense light I used 3 lamps positioned in a row behind the backdrop. I decided to put the object on a black surface to enhance the strong contrast of black and white.
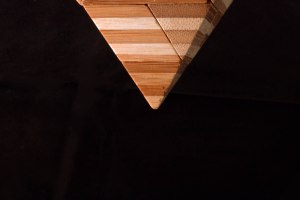
F.36, 10/16 sec, ISO 3200
For this image I practically reversed the technique used above. I used a soft diffused light slightly off centre to the right to create shadow on the left hand side of the object. By rotating the camera and creating an upside down view it adds some interest to the image, as I was very aware that my object shape may be holding me back somewhat.
Texture:
F.22, 10/25 sec, ISO 900
For texture I felt that using a part of the object would be best. As I was only focusing on one section of the object it made it relatively easy to position my lighting. I used 2 diffused lights at the top left and right of the object, and a diffused light positioned behind me – highlighting the almost ‘pimply’ effect on the wood.
F.36, 10/16 sec, ISO 3200
Again I wanted to focus on the ‘pimples’ within the wood, and also to highlight the many scratches on the object. In order to see the scratch effect I had to use a strong light positioned to the back right of the object. When the light was diffused it resulted in an image much like the one above, the only way I could capture the scratches was to bump up the intensity of the light source. I noticed that the left hand side which is in shadow also demonstrates texture as the scratches are mildly apparent here too.
Conclusion:
This assignment was initially very straightforward. On paper it seemed much simpler than the previous assignment. However, I faced several obstacles:
Firstly – the object. At first I had picked a chunky silver ring but decided to find another object as the surface was metal and reflected too much light and the object was too small. I then settled on the pyramid object. I was in doubt as to whether I should have chosen an object that was more interestingly shaped, and not symmetrical.
Secondly, upon choosing the pyramid I was fully aware that it contained no prominent or bright colours….so how could I demonstrate colour?! After studying my available light sources and reading back through the handbook I realised that the objective was not to use a colourful object, but to bring out any kind of colour within the object. i.e the different shades of cream/light brown/dark brown. So I decided to pursue with my chosen object.
Throughout the past 3 assignments I have struggled to whittle my images down to the number required and have sometimes had to choose between 100 – 150. With that in mind I was very conscious of only taking pictures that I felt were strong enough to be a contender.
This is also the first assignment that I have shot completely in manual mode. Something that at first I was petrified of, but will now be doing at every opportunity.
I would have liked to have experimented with natural light, but as I was doing most of my work during winter evenings this was a bit of a challenge.
I feel that the pictures I have submitted fit the objectives and I am pleased overall with what I have created. I found it challenging using the object I picked, but wanted to push my comfort zone. I have learnt a great deal through doing these exercises but especially the assignment. Lighting is possibly the most important and effective tool of photography, whether it is studio lighting or natural available light.
Tutor Feedback:


