Monthly Archives: September 2016

Experimenting With Welding Glass….

I’ve previously mentioned wanting to do long exposure shots but as of yet I don’t own a neutral density filter. After researching online I found multiple articles that claim a sheet of welding glass can give the same results.

So, I purchased a sheet off eBay (shade 12, as dark as possible) for just £1 – this has got to be worth a try!!

The set up was a bit fiddly – it involved numerous rubber bands and I had to focus my shot before attaching the glass over my lens, as there was no way I could actually see through the glass once on.

The glass is tinted green – there’s no way around eliminating this from the image – so shooting in RAW is a must. It’s the only way to process the image to the correct colour.

I experimented with shutter speed times ranging from 3 minutes to 13 minutes.

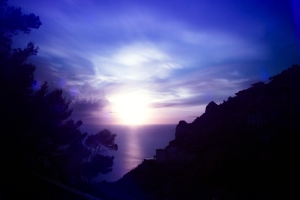
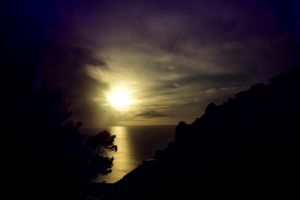
Here’s 2 of my favourites, both with minimal editing – just white balance correction and some minor hue alterations.

They’re of the same view, but at different times before sunset, resulting in a noticeable difference in colour.

As I was shooting a sunset directly in front of me, the movement wasn’t too drastic, and it was a very still evening so the clouds were fairly motionless but it was a great experiment.

I’m really pleased with the outcome. Not bad for a quid….

long-ex-1

long-exp-2

Exercise: Addition (DPP)

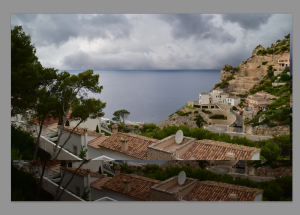
For this exercise I have to photograph 2 images of the same landscape – one that has correctly exposed the sky, and one that has correctly exposed the land. I then have to combine the 2 shots to produce an image where both land and sky are correctly exposed.

I then have to add a different sky completely, creating an unreal image.

Correctly exposed land:

dsc_0298

Correctly exposed sky:

dsc_0299

Combined image:

land-and-sky-exp

It looks slightly HDR-ish in that all areas have low key and high key notes.

It was a fairly simple procedure – first I selected the sky only from the land exposed image, and deleted it:

screen-shot-2016-09-28-at-10-59-48

I was able to select in and around the tree branches and leaves, meaning that there were no chunks of the original sky left.

I then selected the land, and made it into a new layer on the sky exposed image:

screen-shot-2016-09-28-at-11-00-58

Then it was just a case of aligning the new lighter land layer to the old, making sure it fits exactly on top.

With the sky exposure image now without a sky, I can easily add one for part 2.

Using a stock image courtesy of http://www.zalaro.com i’ve used this image for the sky:

beach_of_hawaii_gj022

I selected the sky only and copied it to create a new layer:

screen-shot-2016-09-28-at-11-50-48

I then enlarged it so it was the same size as the initial image:

screen-shot-2016-09-28-at-11-51-31

And finally I hid the sky layer under the land layer to create the final shot:

new-sky

The twigs did prove to be a little difficult to refine the edges, this would have been easier with a landscape like the beach one, that is literally a straight horizon.

Exercise: Enhancement (DPP)

For this exercise I need to focus predominantly on the face and eye areas as my subject for manipulation.

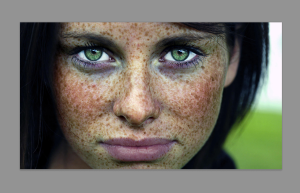
I decided to use a stock image for this exercise as it was quicker. I used the below image, courtesy of Kamere.com – the subject has freckles and blue eyes – I felt that the freckles would add an interesting perspective when strongly edited.

Here’s the original image:

vesn_nach

The first step was to select the area I wanted to edit first using the quick mask tool . I wanted to leave the models eyes and lips, and focus on her skin.

screen-shot-2016-09-07-at-11-26-26

Once I had the area selected I increased the brightness, making it seem as though she was photographed in sunlight:

screen-shot-2016-09-07-at-11-27-07

I then increased the contrast to really draw out her freckles.

screen-shot-2016-09-07-at-11-28-01

After returning to the original image I then focused on the eyes. Here i’ve used to the sharpen tool to really increase the colours and detail of her iris.

screen-shot-2016-09-07-at-11-28-46

After increasing the sharpness i’ve now whitened the whites of her eyes, and used the burn tool to really enhance her eyes. This technique is readily obvious in magazines and advertising, but personally this is on the verge of being too much.

screen-shot-2016-09-07-at-11-30-59

And finally i’ve had a play with her skin tone and eye colour, to produce several image that have been heavily enhanced. It begs the question – ‘is this level of editing acceptable?’ In my opinion it is too much. But as mentioned earlier images like this are extremely common. I suppose it hangs in the viewers opinion.

Blue eyes:

screen-shot-2016-09-07-at-12-40-40

Green eyes:

screen-shot-2016-09-07-at-12-40-13

Brown eyes:

screen-shot-2016-09-07-at-12-39-37


Exercise: Improvement or interpretation? (DPP)

For this exercise I need a portrait photograph taken in the shade. I then need to make some adjustments to improve the overall outcome of the image – making it stand out from it’s surroundings.

Original image:

img_1833


Edited image:

img_1833-edit


As you can see i’ve lightened my nieces face, neck and arm and added some contrast. It would look odd for her face to be much brighter than other areas of her skin, so i’ve selected multiple areas. It’s slightly noticeable that some editing has taken place on her arm, but with more time and attention to detail this could be smoothed over. I would not usually edit and submit a photo that has been enhanced as much as this, i’d prefer to use a different shot or re shoot. However, by using the quick mask tool in photoshop i’ve been able to easily select the areas I want to edit, and brighten them – making Amber stand out more. It’s a very valuable tool in image improvement.

I’ve not done anything to her eyes as that is coming up in the next exercise.