After submitting my latest assignment my tutor pointed me in the direction of other people producing interesting double exposure effects. In particular the work of Francesco Paleari – http://www.arch2o.com/milano-s-profile-francesco-paleari/
My tutor wanted me to recreate Paleari’s technique, which is in the visual style of Kyle Grantham’s double exposure series:
https://www.google.co.uk/search?q=granthams+double+exposure&sa=X&biw=1417&bih=942&tbm=isch&tbo=u&source=univ&ved=0ahUKEwikmrSJrbLQAhUHIMAKHSdWAw4QsAQIGg
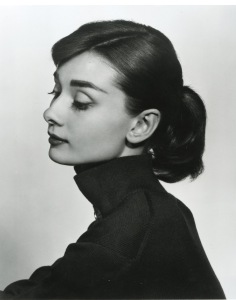
This was a fairly lengthy and somewhat difficult task to produce, but I think I accomplished it well. I used a side portrait of Audrey Hepburn (stock shot) and a misty black and white Yosemite image (again, stock shot.)
Here’s both images in their original state:

Here’s how I did it: (All processed in Photoshop)
Firstly I upped the brightness and contrast of the image. Then I wanted to get rid of the background. This is a fairly simple task, as i’m using a photo with a clean background. Using the Magic Wand Tool I clicked anywhere on the background to select it. Then I selected ‘inverse’ to select Audrey.
Then, using the Refine Edge button I slightly increased the Radius value in the Edge Detection, setting it to 2.0, making the edges less rigid revealing, in this case, the separate hairs. I then set the ‘Output To’ to New Layer with Layer Mask. This creates a copy of the original image with the background hidden.
I then created a new layer, and placed it below the cut out portrait, and filled it with white.
Next step was to add the Yosemite shot. I pasted it as a new layer on top of the Audrey Image. I then held the command button and clicked on the portrait cut out – which reveals her outline on top of the woodland image.
I then added a vector mask to this layer which hides all the background, only making Audrey’s outline and the woods visible.
I then changed the blending mode of this layer to ‘screen’ This basically blends both images, the first stage of our final effect being apparent.
Using the Brush Tool I selected the airbrush soft round 50% and decreased it’s flow and opacity. 25% and 30% retrospectively.
I then selected the Layer Mask of the forest layer, set the fill color to white and painted softly over the areas where the tree tops ended. This makes the image look as if the trees are growing out from Audrey’s hair. The white background helped enormously as the fade technique was very easy to create.
For the final step I did the same as above, only I used black instead of white, and played around with the opacity and flow. This then makes anything dark become clearer – so her facial features. I didn’t want her face to have any secondary exposure. I wanted her features to be flawless, and the effect begin by her hairline.
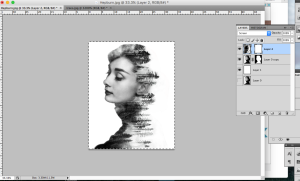
The layering process is shown below on the right hand side:
Here’s the final image:

I’m super happy with the outcome. It was well worth the time spent on researching what different layers do, and when to use them.
I’m happy I used 2 older looking photos as it enhances the vintage feel of the Audrey Hepburn era. I cannot wait to experiment more with this technique, especially on self portraits and with colour.


